PoE2 Ring Crafting (0.5.0): A Universal Triple Flat Damage Guide
Background
This craft is for attack builds that scale flat elemental damage from jewellery. The target item is a Breach Ring with Quality (Attack Modifiers): +60% and several added elemental damage to attacks modifiers.
The route does not start from a clean white base. It starts from a rare Breach Ring that already has +20% to Maximum Quality and at least one strong elemental damage to attacks modifier. The expensive part is trying to fracture that damage modifier, then using Omen-controlled Exalted and Annulment steps to add more damage while removing bad results.
The source example prefers item level 75-78. That range is used to keep the target added damage pool attractive without opening too much higher-level clutter. Check the current mod pool before buying bases.
Why This Craft Matters
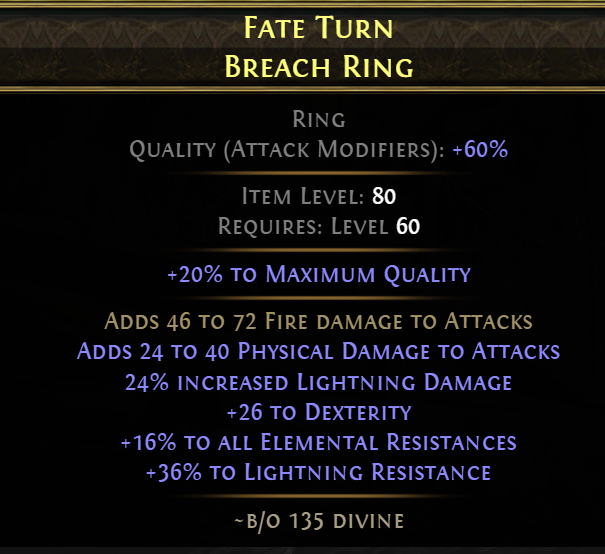
A good result can carry three buyer-facing damage lines:
Adds # to # Lightning Damage to AttacksAdds # to # Fire Damage to AttacksAdds # to # Cold Damage to Attacks
The 60% attack modifier quality scales those lines. That is why the ring can be worth far more than a normal Breach Ring with the same raw modifiers.
This is not a low-budget craft. The fracture attempt can fail, and the later Exalted steps can add the wrong modifier. Treat the finished ring as a high-end project or a market flip only when the spread is clear.
Crafting Materials
| Icon | Name | Qty | Why You Need It |
|---|---|---|---|
 | Fracturing Orb | 1 per serious attempt | Fractures one random modifier on a rare item with at least four modifiers. You need it to protect the first T1 added elemental damage modifier. |
 | Exalted Orb | Several | Adds modifiers after the fracture is secured. Use it with Omens when you need side control. |
 | Orb of Annulment | Several | Removes bad added modifiers or filler stats. A raw annul is dangerous unless the valuable damage line is fractured or the side is controlled. |
 | Omen of Dextral Exaltation | Optional, several | Forces the next Exalted-style action toward the suffix side. TODO verify the correct side for the target added attack damage modifier in the current patch. |
 | Omen of Dextral Annulment | Optional, several | Makes the next Orb of Annulment remove only suffix modifiers. Use the matching side-control Omen for the bad modifier you want to remove. |
 | Essence of the Breach | 1 or more | Adds the +20% maximum quality style modifier used to let the amulet reach 40% quality. TODO verify the exact current English name and item text. |
 | Reaver Catalyst | Enough for 40% attack quality | Adds attack quality to the amulet. This is what pushes the +3 to Level of all Melee Skills line to displayed +4. |
Crafting Workflow
Step 1: Buy the Right Breach Ring Base
Goal: start from a ring that already has the hard quality setup.
Look for a rare Breach Ring with +20% to Maximum Quality. The example route looks for item level 75-78 and level requirement 60. Do not buy a random high item-level base without checking the modifier pool.
The best starting point has one strong added elemental damage to attacks modifier, such as Adds # to # Lightning Damage to Attacks, Adds # to # Fire Damage to Attacks, or Adds # to # Cold Damage to Attacks.
Why this works: the craft makes money from scaling a good flat damage modifier with high attack modifier quality. If the first damage line is weak, the finished ring will not justify the risk.
Step 2: Prepare Four Modifiers Before Fracturing
Goal: make the ring eligible for Fracturing Orb.
The ring must have at least four modifiers before you use Fracturing Orb. If the purchased ring has only three useful lines, add a cheap fourth modifier first.
Keep the fourth modifier disposable. The fracture step chooses one modifier at random. You are trying to lock the T1 added elemental damage to attacks modifier, not a resistance, attribute, mana roll, or filler stat.
Why this works: Fracturing Orb can protect the target line, but it does not choose intelligently. On a four-mod item, the basic chance to hit the desired modifier is only one in four.
Step 3: Fracture the First Damage Modifier
Goal: protect the first strong damage line before spending more.
Use Fracturing Orb once the ring has four modifiers. Continue only if the fractured modifier is the target T1 added elemental damage to attacks line.
If Fracturing Orb locks +20% to Maximum Quality, an attribute, resistance, mana, or another low-value stat, treat the craft as failed. You can sell the miss if it still has market value, but do not keep forcing the same item as a triple-damage project.
Why this works: the fractured damage modifier gives you a protected anchor. Later Annulment and reroll recovery steps can remove bad modifiers without losing that first damage line.
Step 4: Add More Damage With Omen-Controlled Exalted Orbs
Goal: add a second strong elemental attack damage modifier.
Use side-control Omens with Exalted Orb attempts when the ring has an open slot on the correct side. You are fishing for another modifier from the added elemental damage to attacks family.
Good hits are high-tier versions of:
Adds # to # Lightning Damage to AttacksAdds # to # Fire Damage to AttacksAdds # to # Cold Damage to Attacks
If you hit all elemental resistances, attributes, mana, or another non-damage stat, decide whether recovery is cheaper than restarting from a fresh fractured base.
Why this works: the Omen controls the side of the Exalted action. It does not guarantee the exact damage modifier. You are reducing the failure space, not removing it.
Step 5: Remove Bad Results With Side-Controlled Annulment
Goal: open the blocked side without risking the fractured damage line.
If the added modifier is bad, use the matching Annulment Omen with Orb of Annulment so the annul can only hit the side you intend to clear. In the source route, the player removes unwanted suffix results before trying again.
Do not use a raw Orb of Annulment while valuable non-fractured damage modifiers are exposed. If the ring already has two strong damage lines, a blind annul can erase the profit.
Why this works: side-controlled Annulment turns some misses into recoverable misses. It is still a cost sink. Stop if the recovery chain costs more than another base.
Step 6: Apply the Elemental Attack Catalyst
Goal: scale the added damage lines to the final 60% quality state.
Once you have at least two strong added elemental damage to attacks modifiers, apply the catalyst that improves fire, cold, and lightning attack damage modifiers on rings and amulets. The target display is Quality (Attack Modifiers): +60%.
The example final state shows the quality scaling the damage lines hard. A two-damage version can still sell, but the premium target is a three-damage ring.
Why this works: catalyst quality improves the affected modifier family. On this craft, the quality is the multiplier that makes the flat damage lines worth chasing.
Step 7: Decide Whether to Push for the Third Damage Line
Goal: avoid turning a profitable two-damage ring into an expensive miss.
If the ring has two high-tier added elemental damage to attacks modifiers and 60% attack modifier quality, check trade before clicking again. A clean two-damage ring may already be valuable.
Push for a third damage modifier only if your budget can absorb more Omen, Exalted, and Annulment attempts. The best finish is a ring with all three elemental damage families. T1 plus T2 damage can still be realistic. Forcing only perfect T1 rolls is a much deeper gamble.
Why this works: the third damage line is where the item becomes special, but each recovery loop adds cost. Price the current item before deciding that the next click is worth it.
Summary
Use this craft when Breach Rings with +20% to Maximum Quality and one strong added elemental damage to attacks modifier are cheaper than finished 60% quality damage rings.
The core route is simple but risky: buy the right ilvl 75-78 ring, reach four modifiers, fracture the T1 added damage line, then use Omen-controlled Exalted and Annulment steps to add more elemental attack damage. Apply the correct catalyst to reach 60% attack modifier quality.
The main cost is the fracture and recovery loop. If the first damage modifier does not fracture, restart. If the second or third damage attempt misses, recover only while the total spend is still below the price of a comparable finished ring.
Need currency for your craft? If you're short on the initial currency to get started, check out this YouTube video. It efficiently shows you how to use our website's tools to flip currency and build your wealth: Watch the Video Here.
Further Reading & Other Crafting Guides
If you found this guide helpful, you might be interested in our other detailed crafting tutorials:
👉 0.4.0 new Crafting
The staff crafting guide: A detailed guide on creating the bloodmage staff with low cost.
The crossbow crafting guide: A detailed guide on creating BIS crossbow with low cost.
The BIS archmage ring crafting guide: A detailed guide on creating the BIS archmage ring with low cost.
👉 Deadeye Crafting
The gemini bow crafting guide: A detailed guide on creating a high dps bow.
The Visceral Quiver crafting guide: A detailed guide on creating a Bis critical deadeye quiver with low cost.
The deadeye Bis amulet crafting guide: A detailed guide on creating a Bis deadeye amulet with medium cost.
PoE2 50% Movement Speed ev boots Crafting (0.4.0): Learn the complete, decision-based process for crafting 50% Movement speed boots.
The deadeye Bis Jewel crafting guide: A detailed guide on creating a Bis deadeye emerald in 2div cost.
PoE2 Triple Flat damage gloves Crafting (0.4.0): Learn the complete, decision-based process for crafting the triple flat damage gloves in low cost.
👉 Minion Crafting
The minion amulet crafting guide: A detailed guide on creating a +3 minion skill levels amulet guide.
The minion sceptre crafting guide: A detailed guide on creating a +4/5 minion skill level sceptre.
The minion offhand crafting guide: A detailed guide on crafting the perfect offhand(300es, +2 minion skills) with very low cost.
How to Craft an Endgame ES Minion Body Armour in POE2: A detailed guide on creating a top-tier Energy Shield chest piece, starting with fracturing T1 Spirit.
How to Craft an Endgame ES Minion Helmet in POE2 :A detailed guide on creating a top-tier Energy Shield helmet, with +2 minion skills and spirit reserve efficiency.
The minion gloves crafting guide: :A detailed guide on creating Budget Transitional gloves Guide.
The minion rings crafting guide: :A detailed guide on creating Budget Transitional rings Guide.
👉 BloodMage Crafting
The BloodMage ring crafting guide: Master the art of crafting 12D ring with 5D cost
The Bis spell focus crafting guide: a detailed guide for crafting bis spell focus
The BloodMage gloves crafting guide: a detailed guide for crafting the bis bloodmage gloves.
The BloodMage amulet crafting guide(spark build): a detailed guide for crafting bis amulet.
The Bis wand crafting guide: a detailed guide for crafting bis lightning wand
👉 Monk Crafting
The quarterstaff crafting guide: Learn the complete process for quarterstaff crafting in poe2 0.4.0.
The body armour crafting guide: Learn the complete process for monk body armour crafting in poe2 0.4.0.
👉 Basic Crafting
The essence crafting guide: Learn the complete process for essence crafting in poe2 0.4.0.
👉 fracturing Crafting
How to Craft an Endgame ES Helmet in POE2 (Kamasan Tiara): Master the art of crafting 500+ ES helmets with this comprehensive flowchart guide.
How to Craft BIS Sleek Jacket in POE2: Master the art of crafting 400D Sleek Jacket with this comprehensive flowchart guide.