The Only Breach Atlas Guide You Need for POE2: Unlocks & Optimal Tree
So, you've read our main Breach farming guide and have chosen your strategy. Now, it's time to supercharge your profits by optimizing your Atlas Passive Tree. The right passives can dramatically increase your efficiency, but first, you need to unlock them.
This guide will cover everything you need to know: how to acquire all 8 Breach Atlas passive points and the single, universally optimal way to allocate them.
How to Unlock Your Breach Atlas Passives
Breach passive points are earned by defeating Breachlords within their domains, which are accessed using Breachstones. There are four unique bosses, and defeating each one for the first time grants you passive points, for a total of 8 points.
However, there's a steep difficulty curve.
You might be thinking, "My build isn't strong enough to kill all the bosses." That's a common and perfectly valid concern. Here’s the practical approach:
- The First Two Bosses: Most builds capable of clearing endgame maps should be able to handle the first two Breachlords without much trouble. This will get you your initial set of passive points.
- The Final Two Bosses: The last two bosses are significantly tougher. Instead of struggling or respeccing your build, the most efficient solution is to hire a stronger player for a "carry" service.
Don't view this as a failure; view it as a strategic investment. The small currency fee you pay for a carry will be quickly earned back by the massive increase in farming efficiency you'll gain from having all 8 passive points.
The Optimal Passive Tree: Density is King
Once you have all 8 points, how should you spend them? Luckily, the answer is simple. Whether you're hunting for Rares (Strategy 1) or stacking Splinters (Strategy 2), the optimal passive tree remains the same.
This is the recommended allocation:
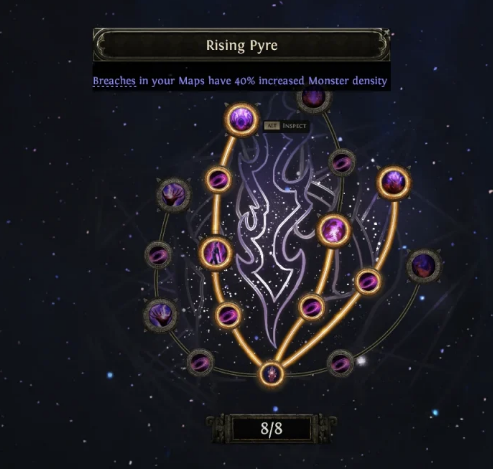
The entire tree is built around reaching one keystone passive: Rising Pyre, which grants "Breaches in your Maps have 40% increased Monster density".
You might be tempted by other nodes like "Frantic Invasion," which offers a direct increase to Splinter drops. However, increased monster density is fundamentally more powerful and universally beneficial.
Why is Monster Density better?
- More Monsters = More Loot (of all kinds): A 40% increase in monster count means 40% more enemies that can drop Splinters, currency, and items. This raw increase in monster volume benefits the Splinter farming strategy more than a smaller, direct Splinter bonus would.
- More Monsters = More Rares: For the Jackpot Hunter strategy, more monsters mean more chances for Rare monsters to spawn, which is the entire basis of that method's profit.
- A Universal Multiplier: Monster density acts as a global multiplier for everything you want from the Breach. It enhances both farming strategies without compromise.
Summary
Optimizing your Atlas for Breach farming is a two-step process:
- Unlock All 8 Points: Defeat the first two Breachlords yourself and invest in a carry service for the final two. The return on investment is well worth it.
- Allocate for Density: Follow the passive tree above to grab all the minor nodes leading to Rising Pyre. Prioritizing monster density is the key to maximizing returns, no matter which farming strategy you're using.
With your Atlas Passives correctly allocated, you are now fully equipped to tackle Breaches with maximum efficiency. Go put your optimized strategy to the test and watch the currency roll in.
Further Reading & Other endgame Guides
If you found this guide helpful, you might be interested in our other endgame guides
👉 Must Know For Profiting
The Logic of Wealth in PoE2: Understanding the Economy Behind the Grind.
👉 Ritual
The Deep Dive into the PoE2 Ritual Mechanic: A Deep Dive Into the Ritual mechanic.
The Ultimate Ritual Farming Guide: The Ultimate Tablet & Waystone Setup about Ritual Farming.
The Ritual Atlas Passive Guide: Three Core Farming Strategies.
👉 Breach
The Only Breach Atlas Guide You Need: Unlocks & Optimal Tree.
The The Best Builds for Breach: The High-Speed Clearer.
poe2-catalyst-guide: How to Use, Get, and Profit.
👉 Expedition
POE2 Expedition Crafting(Maximize Your Profit): Practice and Example
PoE2 Recombinator Guide: The 100 Divine Crafting Engine
👉 Early Game Farming
Massive Profit in Abyss Tablet: Rolling Abyss Precursor Tablets for Massive Profit
Early Map Strategy: Ranking the Top 5 Farming Mechanics
The Road to Your First 50 Divines: Zero-Cost Strategies in PoE2
The 3-to-1 Flip: An Advanced POE2 Currency Strategy for Essences & Oils
How I Made 100 Divines Flipping Maps: A POE2 Early Game Farm Guide